Project
Stop It!
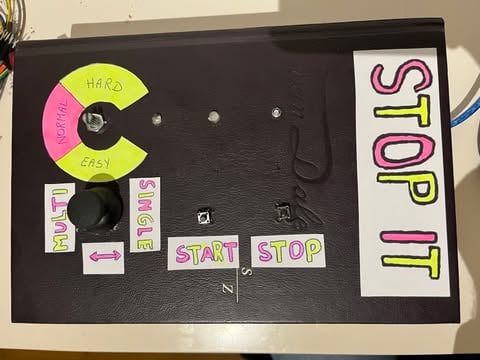
About the Project
"Stop It!" is a physical, lightning-fast reaction game that revolves around focus and timing. The project combines custom-written hardware logic with a highly unique, upcycled enclosure: an old Van Dale dictionary from the thrift store.
The game tests the player's reflexes by displaying random colors on RGB LEDs. Players must press at the exact right moment to score points, after which the game becomes increasingly faster and more challenging.
Core Features
- Game Modes (Single & Multi): Using an analog joystick, the player can choose between a single-player or a multiplayer mode at the start. In multiplayer, players take turns, and the winner is calculated at the end.
- Adjustable Difficulty: With a rotary knob (potentiometer), the player can determine the starting speed (Easy, Normal, Hard). For advanced control, the initial speed (interval) can also be exactly overridden in milliseconds via the serial monitor.
- Reaction Gameplay: At the start, one specific LED lights up in a specific color as your 'target'. Once the game begins, the LEDs light up randomly. The player must press the stop button exactly when their target reappears.
- Dynamic Speed: With every correct press, the score increases, and the wait time (interval) decreases by 50 milliseconds, causing the LEDs to blink faster and faster.
- Audio-Visual Feedback: Three RGB LEDs provide the visual spectacle, while a built-in buzzer offers auditory feedback (short beeps for a point, a longer error tone for game over).
How I Built This (The Process)
This project required a combination of electronics, C++ programming, and out-of-the-box creativity for the enclosure.
Step 1: Prototyping & Electronics I started by building the circuit on a breadboard. The system is controlled by an Arduino and includes a joystick (read via the X-axis), a potentiometer, two push buttons (Start/Stop), a buzzer, and three RGB LEDs. To prevent cable spaghetti, I organized the pins efficiently and used the internal pull-up resistors (INPUT_PULLUP) of the Arduino for the buttons.
Step 2: Logic & C++ Coding The "core" functionality was written in C++.
- Timers: To keep the game running smoothly, I avoided blocking code like
delay()during gameplay. Instead, I track time usingmillis()for both the game duration and the blinking LED intervals. - Randomization: To prevent the Arduino from choosing the exact same predictable pattern at every startup, I used an unread analog pin (A5) as a 'seed' for the random generator (
randomSeed(analogRead(A5))). There is also logic in the code that prevents the same LED from getting the exact same color twice in a row. - Debouncing: I programmed a debounce interval of 200ms on the stop button to prevent a single physical press from being registered as multiple presses.
Step 3: Creating the Enclosure (Upcycling) To give the game a unique and tactile look, I converted a thick Van Dale dictionary. I carefully cut out the pages to create a hollow space to hide the breadboard, the Arduino, and all the wiring. I made holes in the cover to mount the components (joystick, rotary knob, LEDs, buttons) and added hand-drawn, playful labels to them.
Step 4: Troubleshooting (Debugging) During testing, I encountered an issue where strange characters (squares) appeared in the serial monitor at startup. After analyzing the issue, I solved this by adding a delay(2000) in the setup() function, giving the hardware time to initialize properly before serial communication began.